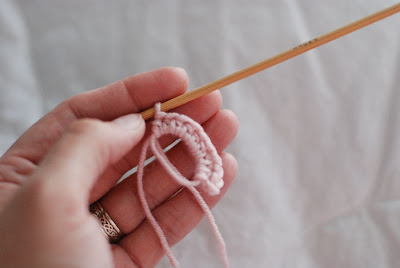
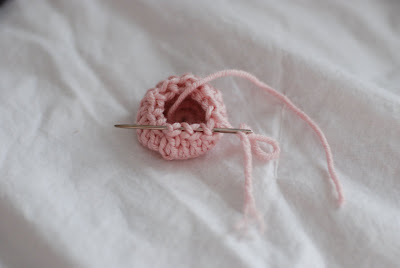
 When I looked for directions on crocheting buttons, I couldn't find directions that were very helpful. One of my frustrations with yarn work is that most patterns are written in a series of abbreviations and often don't come with a picture. So, as I figured out how to make these buttons, I thought I'd make a tutorial so there would be at least one on the web. Hopefully someone will find it helpful.
 Supplies needed: Yarn, crochet hook (this one is a size E), a yarn needle and plastic rings (these are 1 1/8 inch size). I found these plastic rings at Hobby Lobby. They were not at my local yarn store or at WalMart. I found some plastic rings in the sewing section of Hobby Lobby which were a full $2 more expensive than these, which I found with the drapery hardware. They come in different sizes. Choose the one that, with your thickness of yarn, will fit your buttonhole!
 First, make an adjustable ring (or magic ring). Chain two and make 10 half-double crochets in the ring.
(If you don't know about the magic ring, here is a good tutorial.)
 Pull your ring closed and then slip stitch to join.
 Chain two. This will count as your first half-double crochet. Make another half-double crochet in the space under the stitch, between posts. This will give the yarn a tighter weave. Make two half-double crochets in space under the second stitch. Make one half-double crochet in the space under the third stitch. Repeat the pattern all the way around the ring.
 Join in the front loop of the final stitch with a slip stitch. Then chain 3.
 Now in the back loop of each stitch, do one double-crochet all the way around. You should end up with a little cup.
 At the end of the round, join with a slip stitch and fasten off. Leave a tail of four or five inches and cut.
 Next, take one of your plastic rings and put it in the middle of the cup, with the yarn from your magic circle feeding through the center of the plastic ring.
 Thread the other end through the needle.
 Take the needle and thread it through each stitch, all the way around the cup.
 When you reach the end, you should be able to tell that the hole is ready to close. Be sure that the yarn from the magic circle is still sticking out. Then give it a tug and close it up!
Pull the yarn from the magic circle tight and then tie it and your other piece of yarn together.
 Make as many as you'd like! You can adjust the stitch from half-double or double crochet to single crochet and half-double, or increase or decrease your beginning amount of stitches, the amount of rows, etc. depending on how big you want your button to be, the thickness of your yarn, etc. It's very adaptable. And doesn't it look cool?

31 comments:
Wow Apey, this is really impressive!
Great tutorial- Thanks
Thank you so much for the tutorial. This has been so helpful.
Kay in Virginia
Hi - thanks for this tutorial. I'm going to post the link in a group I lead on Izannah Walker dolls at ning. :-)
Dixie
What a good tutorial....just what I was looking for. Now I just have to find the plastic rings I know I have lying around somewhere....Also love your home page.
Adrienne in Ottawa, Ontario
I was searching the internet to locate this information today and found your tutorial. Much prefer the method of surrounding the ring vs. working the crochet around the ring. Thank you for the effort!
I have had directions forthese buttons before, but none so clear and encouraging. Nice job. Ann
First creative button concept I have seen. Will try them on a child's jacket sweater. Love the fact that they are relatively flat, have the rigid ring in them to hold shape and can be played with using different size hooks and threads.
First creative button concept I have seen. Will try them on a child's jacket sweater. Love the fact that they are relatively flat, have the rigid ring in them to hold shape and can be played with using different size hooks and threads.
Thank you for this great tutorial.
God bless you :)
Catherine from Dominican Republic
I have always been looking for a tutorial like this one. Thank you so much!
Can I just say I love this!? Thanks for the tutorial. I always have a problem reading patterns without pictures coordinating with steps. Love this.
Hi April. Came across the button tutorial on Pinterest. I think it's amazing! Linking up at Tangled Happy tomorrow. Thanks so much for sharing this. :)
Genius. Oftentimes the right button makes the finished piece that much better and I always struggle matching the buttons I find in my local fabric store with a buttoned cowl or cardigan I've just crocheted. Thanks for sharing!
THANK YOU SO MUCH FOR THE TUTORIAL.
I LOVE YOUR HOME PAGE
MARTHA IN AUSTIN, TX
Those are the sweetest buttons! I've been crocheting for about a week and am getting the hang of it. I'll be having a go at your button tutorial as soon as as I know what I'm doing a bit more! lolol Your tutorial is very clear and easy to follow. The one for the magic loop looks good, too. Thank you for sharing!
Completely LOVE...I know what I am making tonight : )
This is AMAZING! Thank you so much! I've wondered about crochet buttons. I can't wait to try them. I foudn you through Tangled Happy.
Thanks for this easy tutorial help me so much.
That's wonderful, thank you very much.
Blessing
This is a great tutorial! Thanks for sharing it! I linked to this page on my blog roundup of crocheted buttons this morning. :) http://www.mooglyblog.com/2012/05/30/how-to-make-crochet-buttons-five-free-patterns/
Nice tutorial. Thanks for the clarity and the good-looking button pattern. Nice presentation.
Just went back and read your bio sketch. How wonderfully you put things into words. And, how much love you exude. An inspiration in these times. Your sisters, other relatives, and friends, and your readers, are very blessed to make your acquaintance...as am I. You are an inspiration. And do a bang-up tutorial, too! Love your decorative home page.
To find smaller plastic rings look in drapery hardware section of fabric store,Roman blind rings.
Thanks for this tutorial. I needed to make a few buttons for a cushion I'm making and this is perfect!
Thanks so mich for posting this tutorial! This is how my great-grandma made buttons and pulls for her shades. I think they will be the perfect touch to a sweater I just finished! Woohoo!
If you have difficulty finding the plastic rings, use buttons instead! I am using up lots of buttons in my stash this way.
Great tutorial - thank you very much.
Thanks! Made a ring of yarn to use instead, while making a travel project. Chained as tightly as the yarn would get, then chained back with a bigger hook using the small chain, tied it together into a ring, and single crochet around a couple times to get it the right size. Not flopy like a flat button, and no extra trip to the store.
Thank you so much .. this is great... I happen to really like buttons and I can do these in any color I choose.. Thanks again. Flora @ The Silver Thimble... God Bless you and your family
This was perfect. You are a natural teacher. This tutorial is excellent for beginners and experienced knitters or crocheters. Great job!
Just what I needed! Couldn't find a button for some flip-topped mittens. The pattern wanted Velcro, but I know from experience that it only makes a mess with yarn!!
They look great with their matching buttons❣
Post a Comment